
Give the Face Its Character
- Build Your Character
- 30 minutes
- Beginner art · Ages 8+
Use a Details layer for eyes, eyebrows, a beard and a friendly expression.
Downloads
6 files
Start with a blank 32 × 32 canvas in Piskel. Use the character reference as your guide and draw each small part yourself. Keep an editable .piskel save after every lesson; PNG and GIF are exports to share; the .piskel file keeps the editable project and its layer/frame structure. Save your own work before importing a comparison.
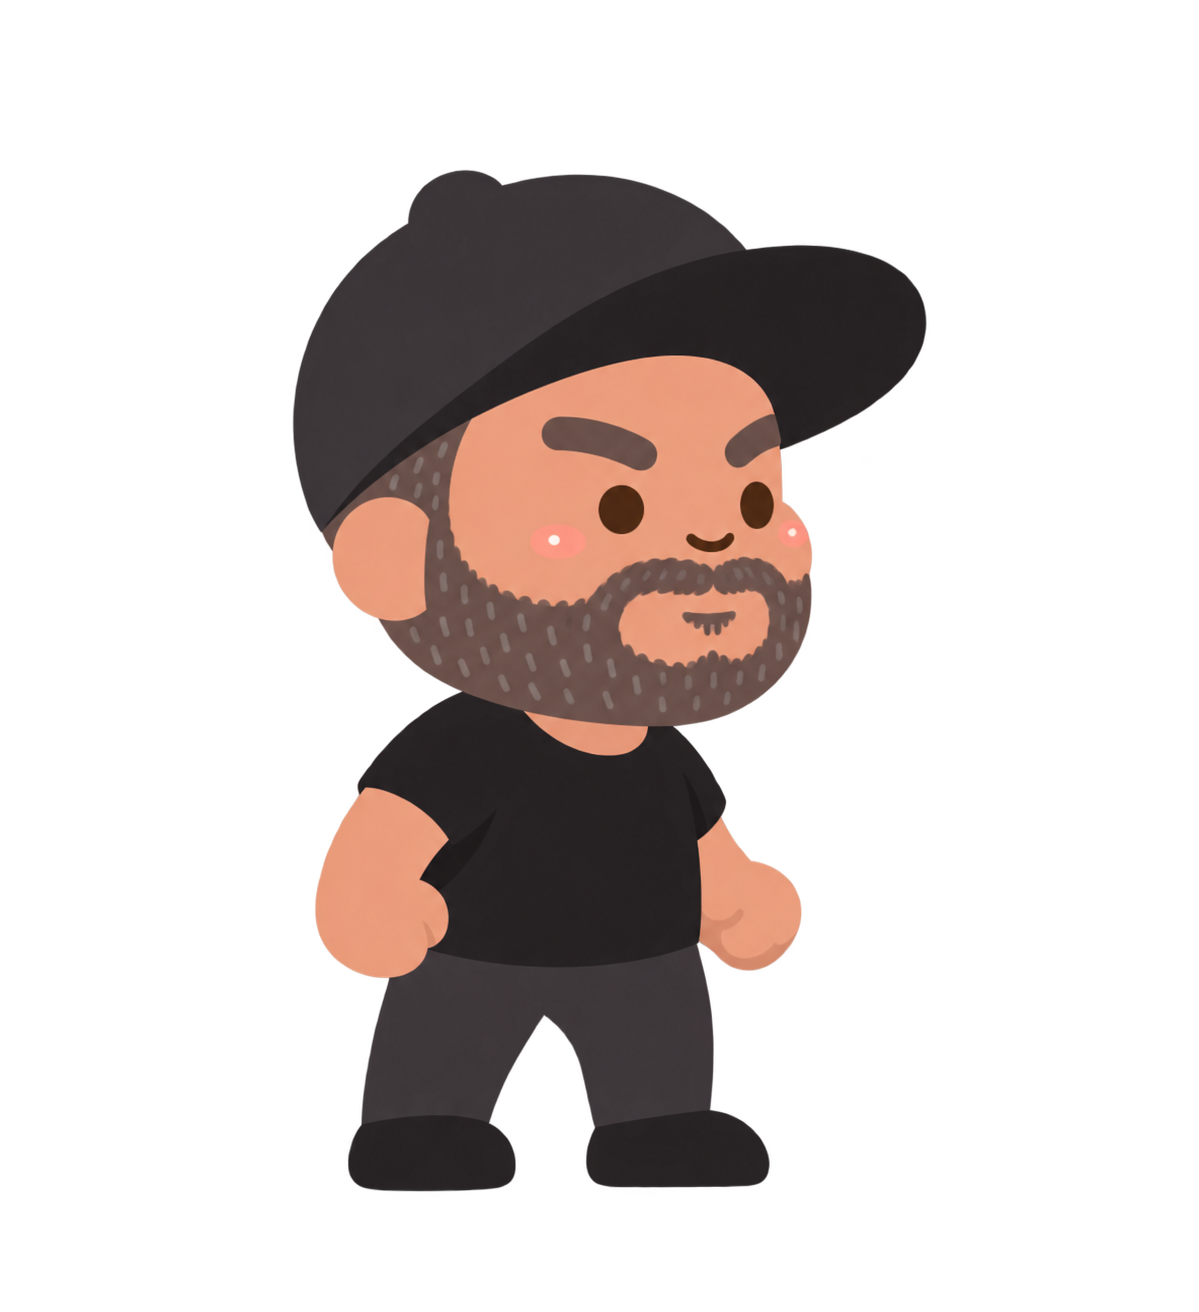
The supplied standing character used as a visual reference. Students draw a simpler pixel version from a blank canvas.
An editable comparison of the completed character and wave. Save your own .piskel before importing another project.
Separate end-of-lesson Piskel files for checking your progress. Extract the ZIP and open only the comparison you need.

The finished transparent 32 × 32 standing picture, ready to use as one game costume.

All three 32 × 32 frames arranged side by side in one transparent 96 × 32 PNG. Import as a sprite sheet only when your game editor supports it.
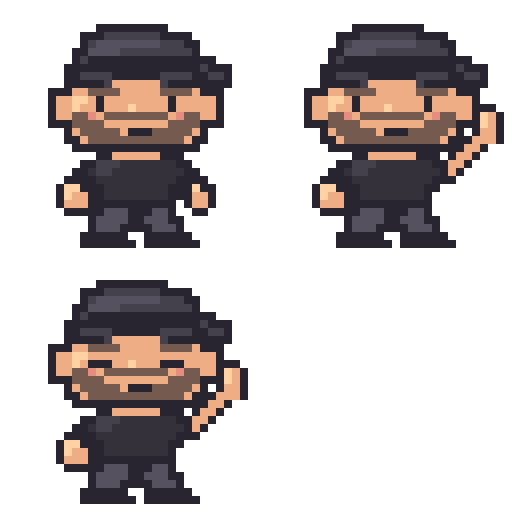
A 256 × 256 enlarged animation for previewing or sharing. Keep the editable .piskel project for drawing changes.
Your goal
Draw a readable face on a separate Details layer while keeping the Base artwork intact.
Small faces need only a few carefully placed pixels. We will put the facial features on a new layer so the head color stays separate. Keep the expression simple and friendly.
Step 1 — Add a Details layer
- Click the + button in Layers to add a blank layer above Base. Click the pencil button, Edit layer name, type Details, then press Enter.
- If Base looks faint, open Preferences → Misc and set Layer opacity to 1.00. This editing preference makes the other layers fully visible on the large canvas; your artwork has not disappeared.
- Return to the canvas with Details selected. Keep Preview all layers enabled. Empty places on Details remain transparent, so Base can show below it.
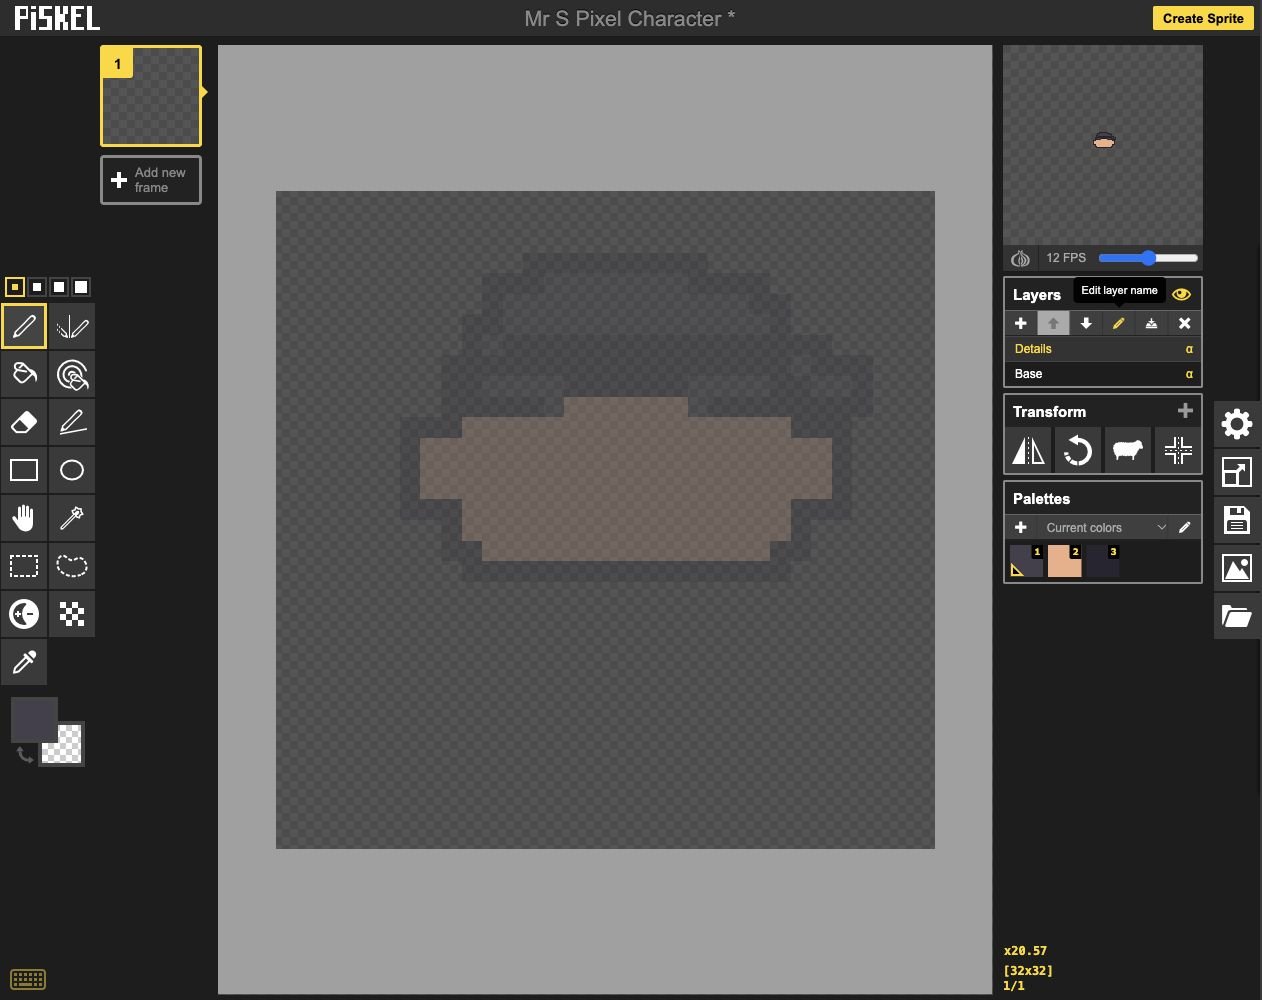
- Click: Add a blank layer with +.
- Check: Name it Details above Base.
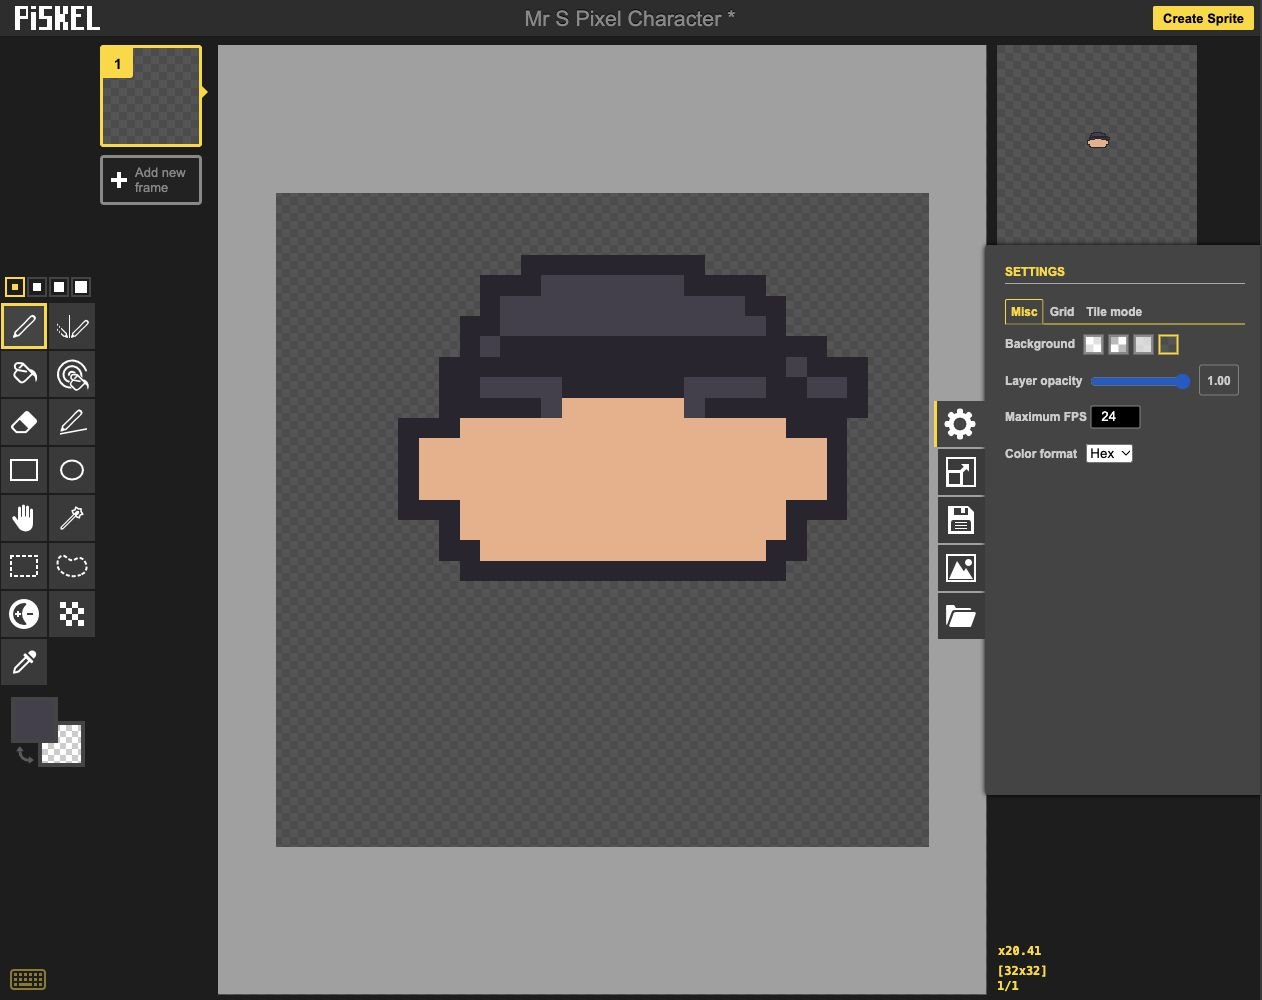
- Click: Open the Misc settings tab.
- Add: Set Layer opacity to 1.00.
- Check: The other layer is fully visible again.
Check: Base and Details are both listed, Details is selected, and the head remains visible in full color.
Step 2 — Place the eyes
- Choose the dark outline color and the Pen. Add two small eye shapes on the skin area.
- Leave space between the eyes. Look at the preview after each eye rather than covering the face with detail.
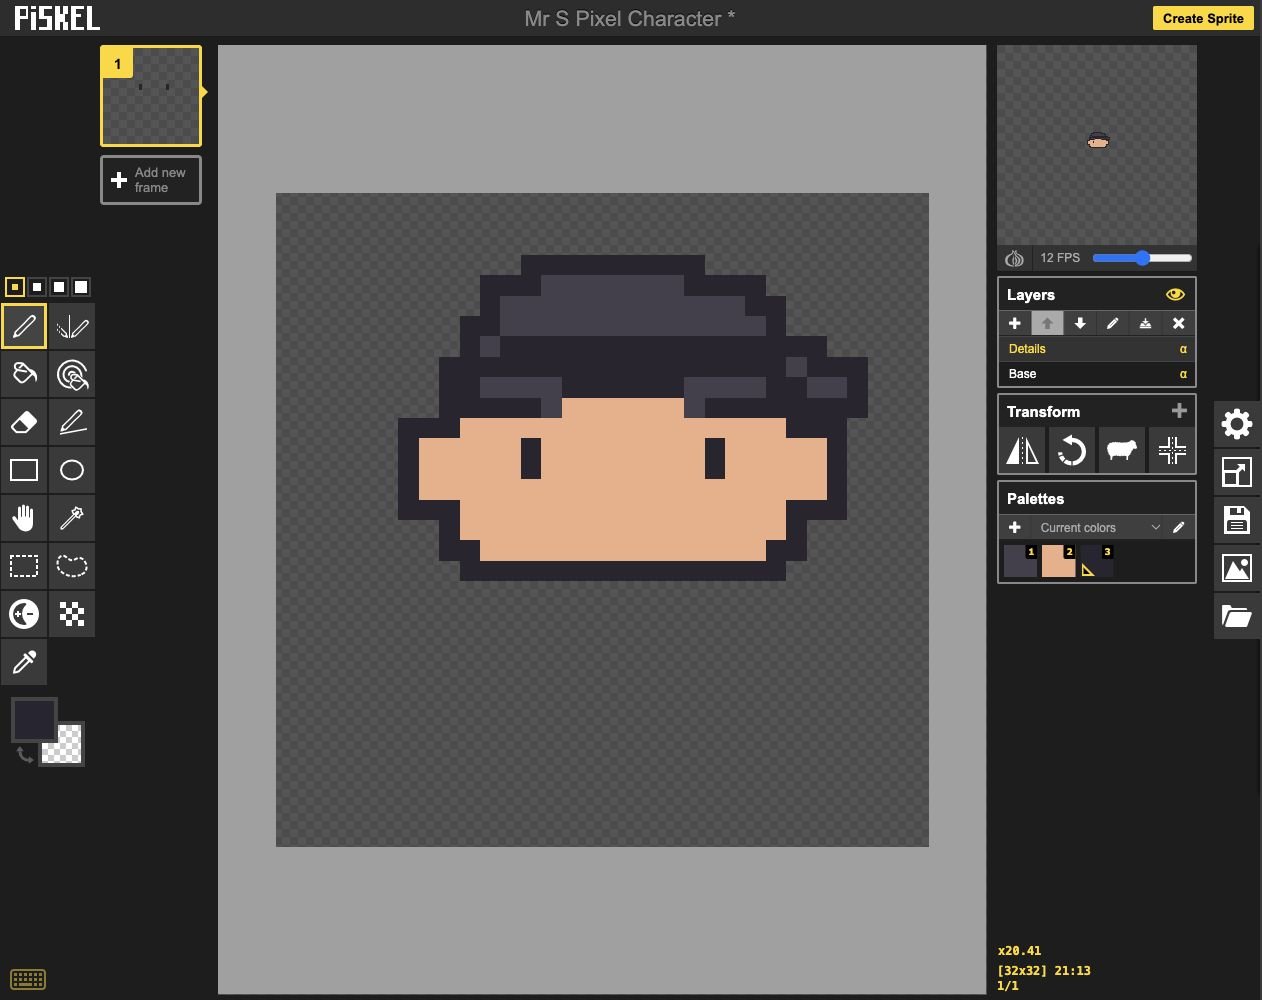
- Check: Draw facial features on Details.
- Add: Place two small, separate eyes.
Check: Two separate eyes are visible at the small preview size.
Step 3 — Add the eyebrows
- Choose the beard color #755a50 and add a short eyebrow above each eye.
- Use small stepped shapes. Leave a skin-colored gap between each eyebrow and eye.
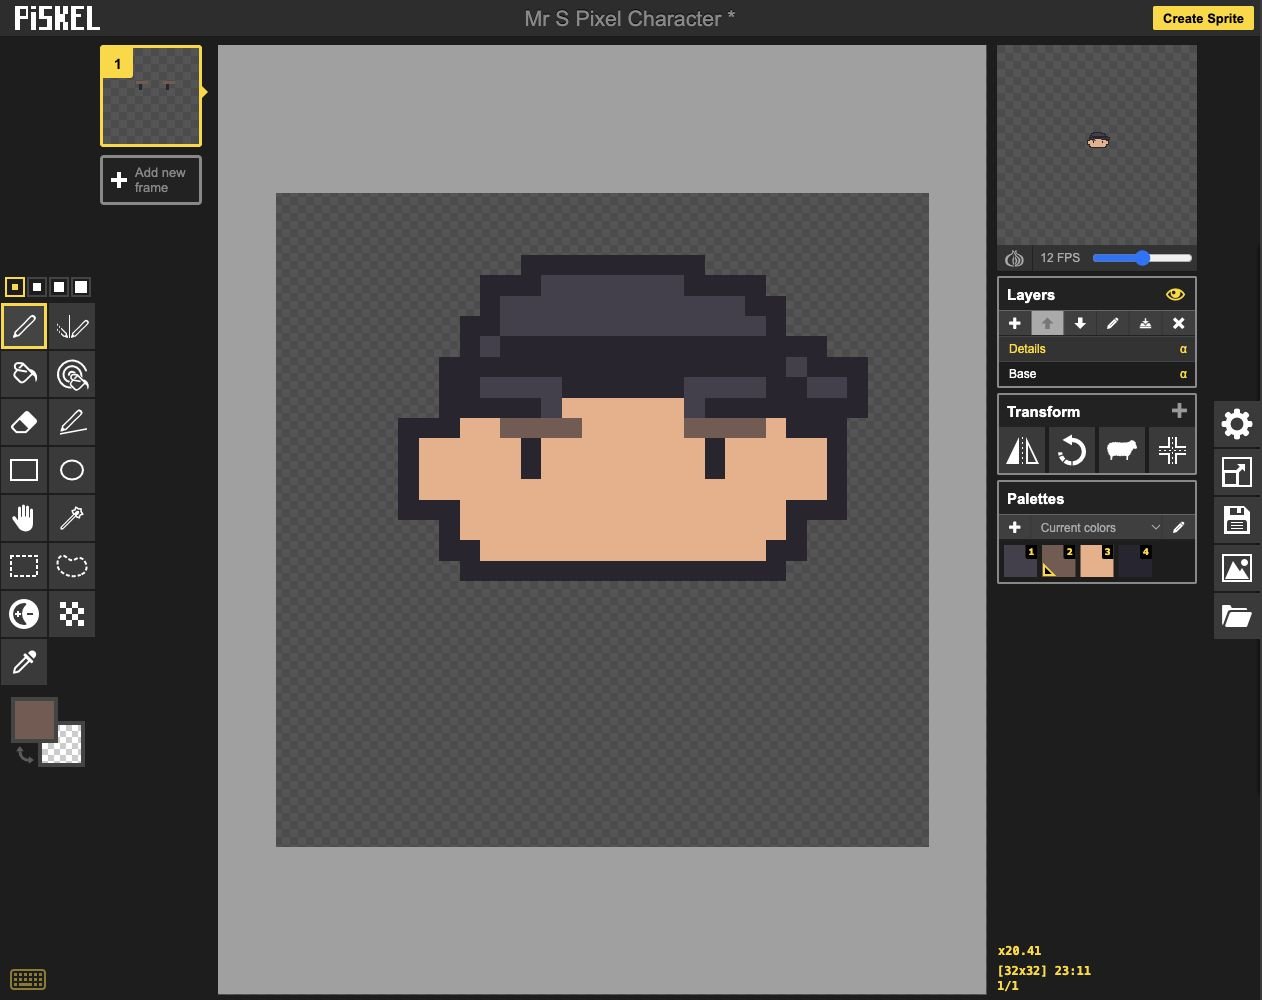
- Add: Add short eyebrows above the eyes.
Check: The eyebrows help the face look like the reference without joining the eyes.
Step 4 — Shape the beard
- Choose #755a50 and add the beard around the lower cheeks and chin on Details.
- Keep a skin-colored opening near the mouth. Use the picture to make the beard one clear shape instead of many scattered dots.
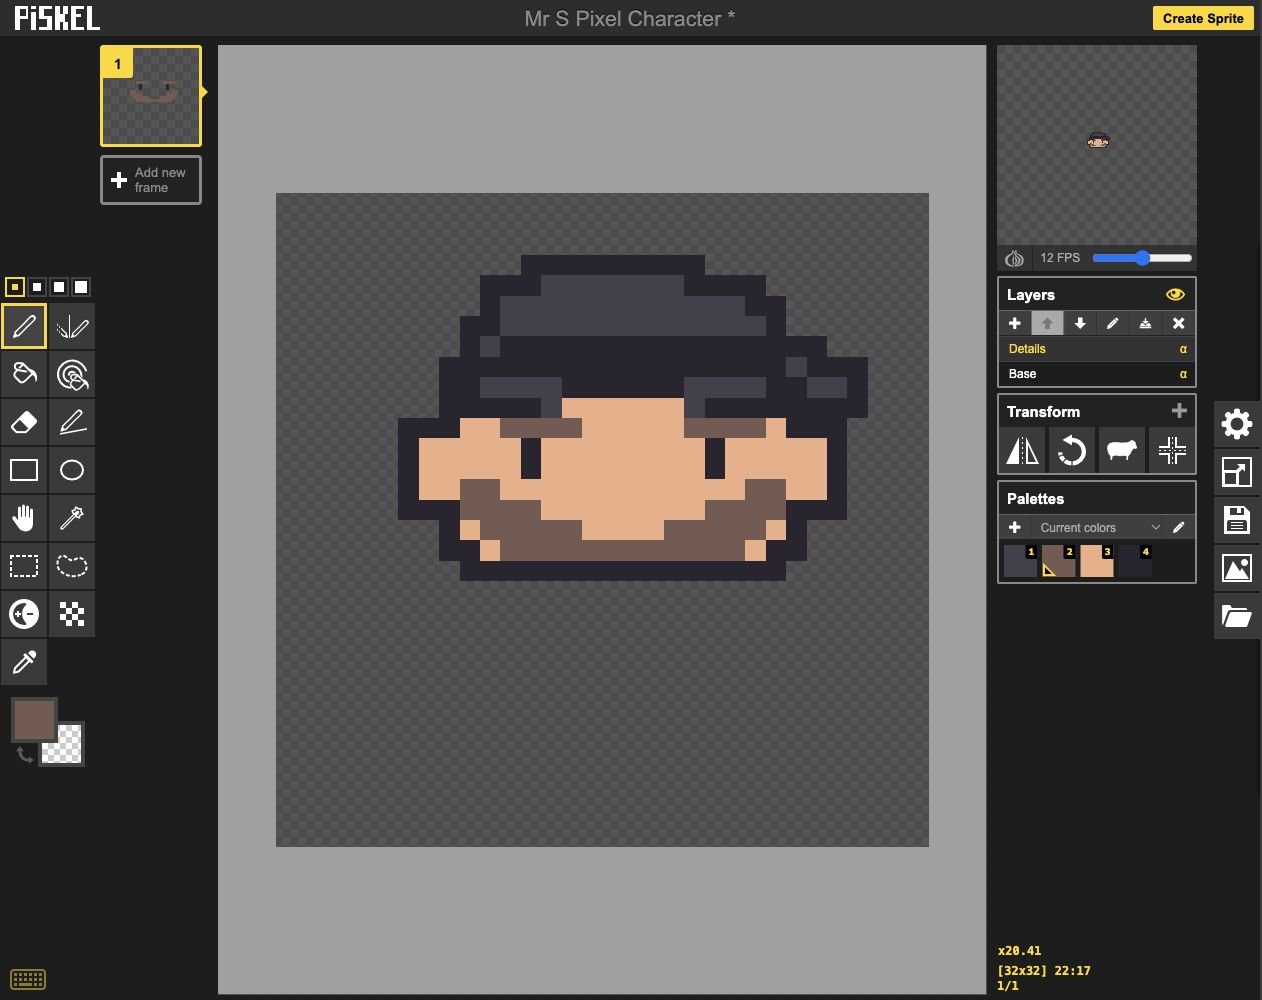
- Add: Add the beard around the lower face.
- Keep: Leave a skin-colored mouth opening.
Check: The beard frames the lower face, with room left for the mouth.
Step 5 — Add the mouth and moustache
- Choose the outline color #282530 for a small mouth in the opening. Use the beard color #755a50 for a short moustache just above it.
- Keep these marks separate enough to read. If the mouth becomes a dark blob, Undo and try fewer pixels.
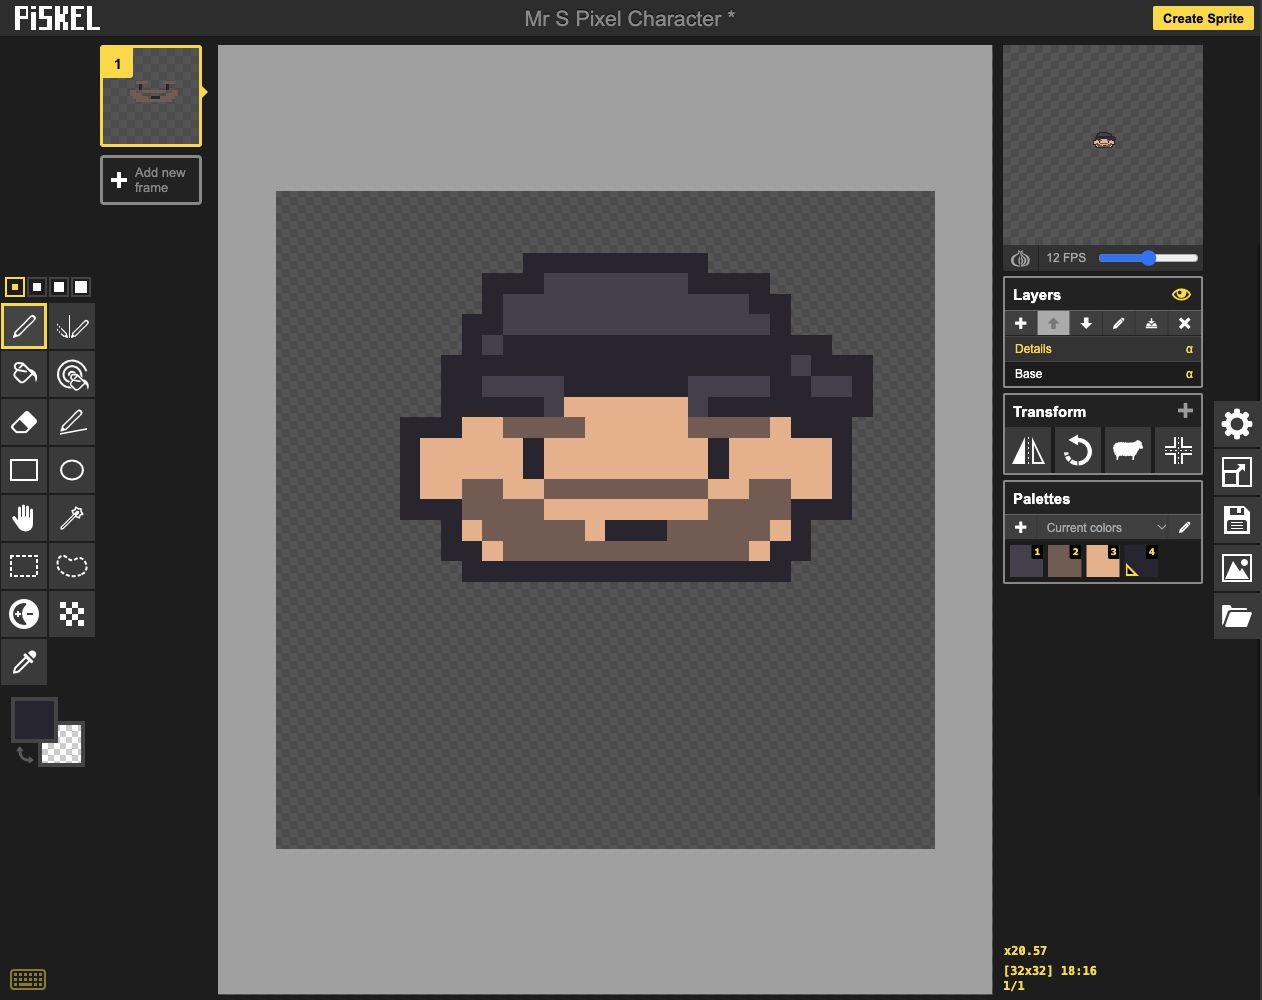
- Add: Add the mouth and moustache.
Check: The face has a readable mouth, moustache and beard at preview size.
Step 6 — Add cheek color
- Choose the optional cheek color #e58e7e. Add a tiny cheek mark on each side of the face.
- Use only a few pixels. The skin should remain the main face color.
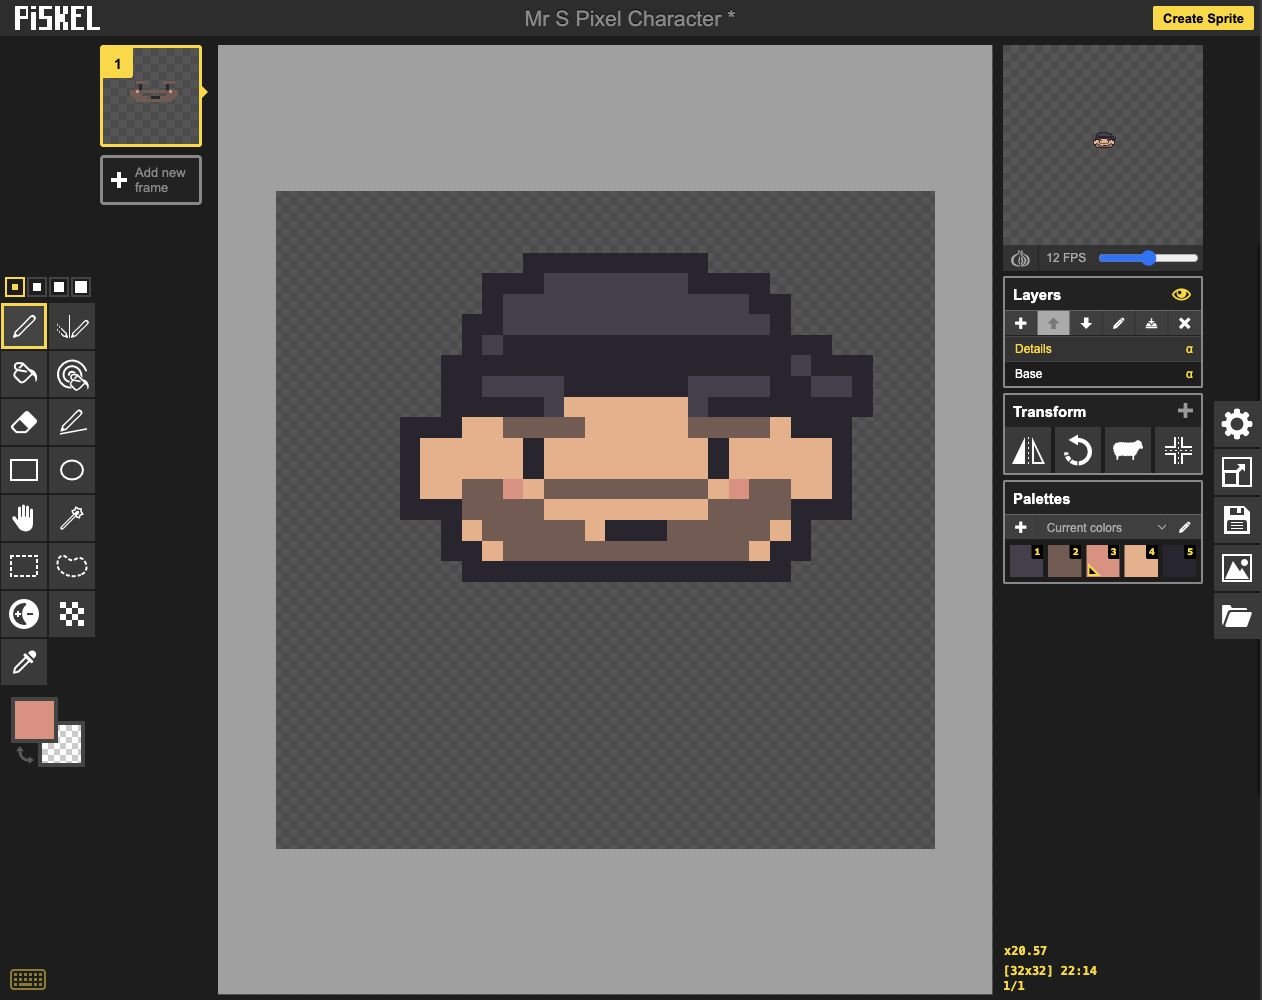
- Add: Use small cheek-color clusters.
Check: Cheeks add warmth without hiding the eyes or beard.
Step 7 — Check the face at normal size
- Look at the small preview, then zoom in only to repair a specific pixel.
- Select Base and then Details to remind yourself which part each layer holds. Save this face stage as an editable copy.
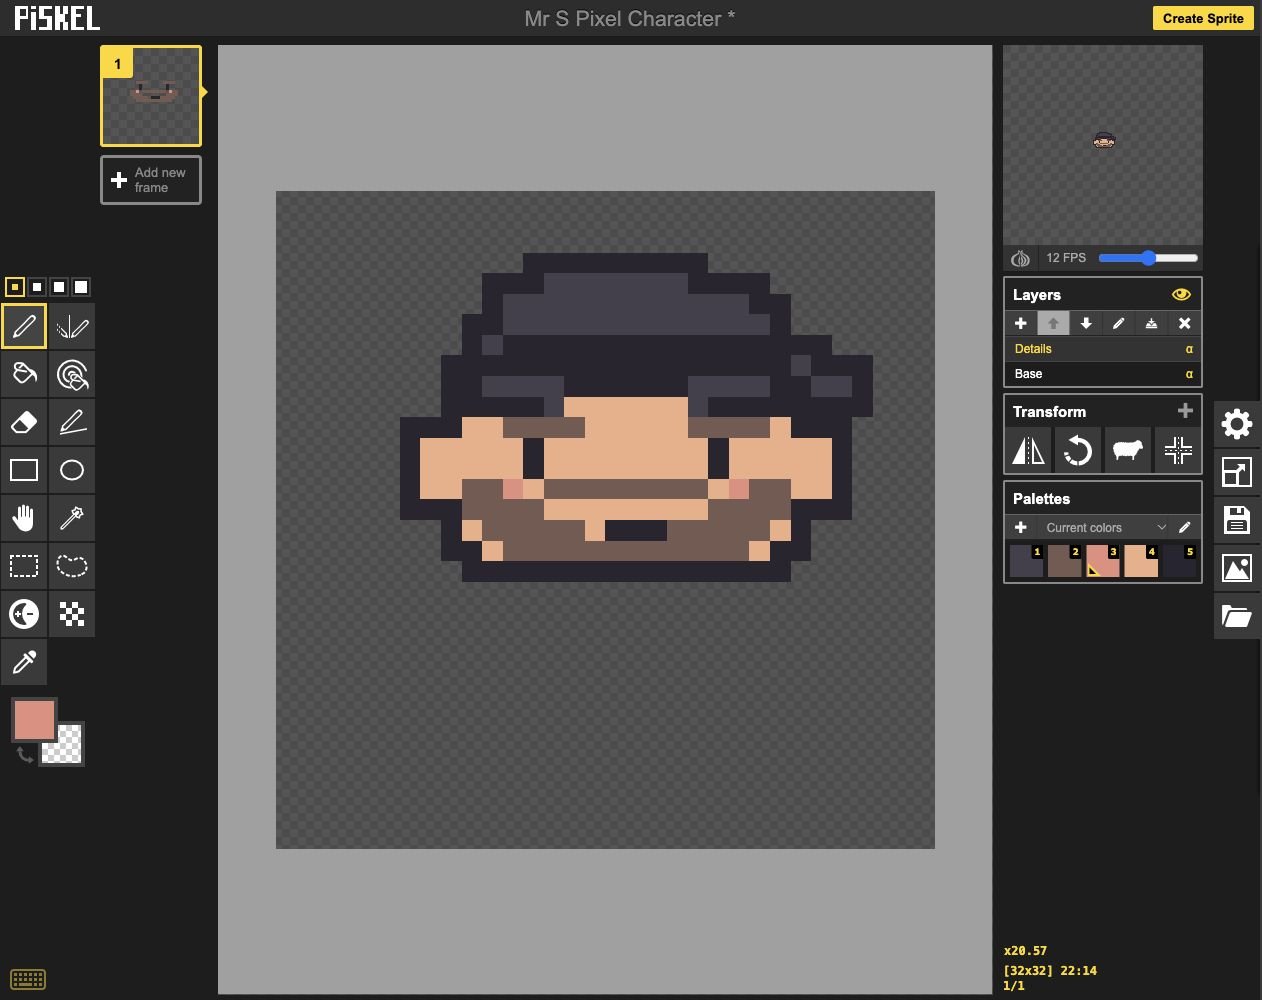
- Check: Check the cap, eyes, brows and beard together.
- Check: Use the combined preview for the whole face.
Check: The face is readable when small, and both layers are still present.
Ready for the next step?
Return here anytime to review.
Lesson discussion
Ask a question or help a classmate. Mr. S can reply here.
Loading discussion…