
Save, Export and Use Your Pixel Art
- Bring It to Life
- 25 minutes
- Beginner art · Ages 8+
Keep the editable project and export pictures that other tools can use.
Downloads
6 files
Start with a blank 32 × 32 canvas in Piskel. Use the character reference as your guide and draw each small part yourself. Keep an editable .piskel save after every lesson; PNG and GIF are exports to share; the .piskel file keeps the editable project and its layer/frame structure. Save your own work before importing a comparison.

The supplied standing character used as a visual reference. Students draw a simpler pixel version from a blank canvas.
An editable comparison of the completed character and wave. Save your own .piskel before importing another project.
Separate end-of-lesson Piskel files for checking your progress. Extract the ZIP and open only the comparison you need.

The finished transparent 32 × 32 standing picture, ready to use as one game costume.

All three 32 × 32 frames arranged side by side in one transparent 96 × 32 PNG. Import as a sprite sheet only when your game editor supports it.

A 256 × 256 enlarged animation for previewing or sharing. Keep the editable .piskel project for drawing changes.
Your goal
Reopen an editable .piskel file and export a PNG sprite sheet and looping GIF.
Save keeps a project you can edit. Export makes a picture for another app. Keep both: a GIF or PNG does not replace your layered .piskel project.
Step 1 — Save the editable animation
- Use Save as .piskel, the save method from lesson one. This time your copy keeps all three animation frames and both layers.
- Keep this copy separate from the earlier one-frame standing backup. Use a name you can recognize in your course folder.
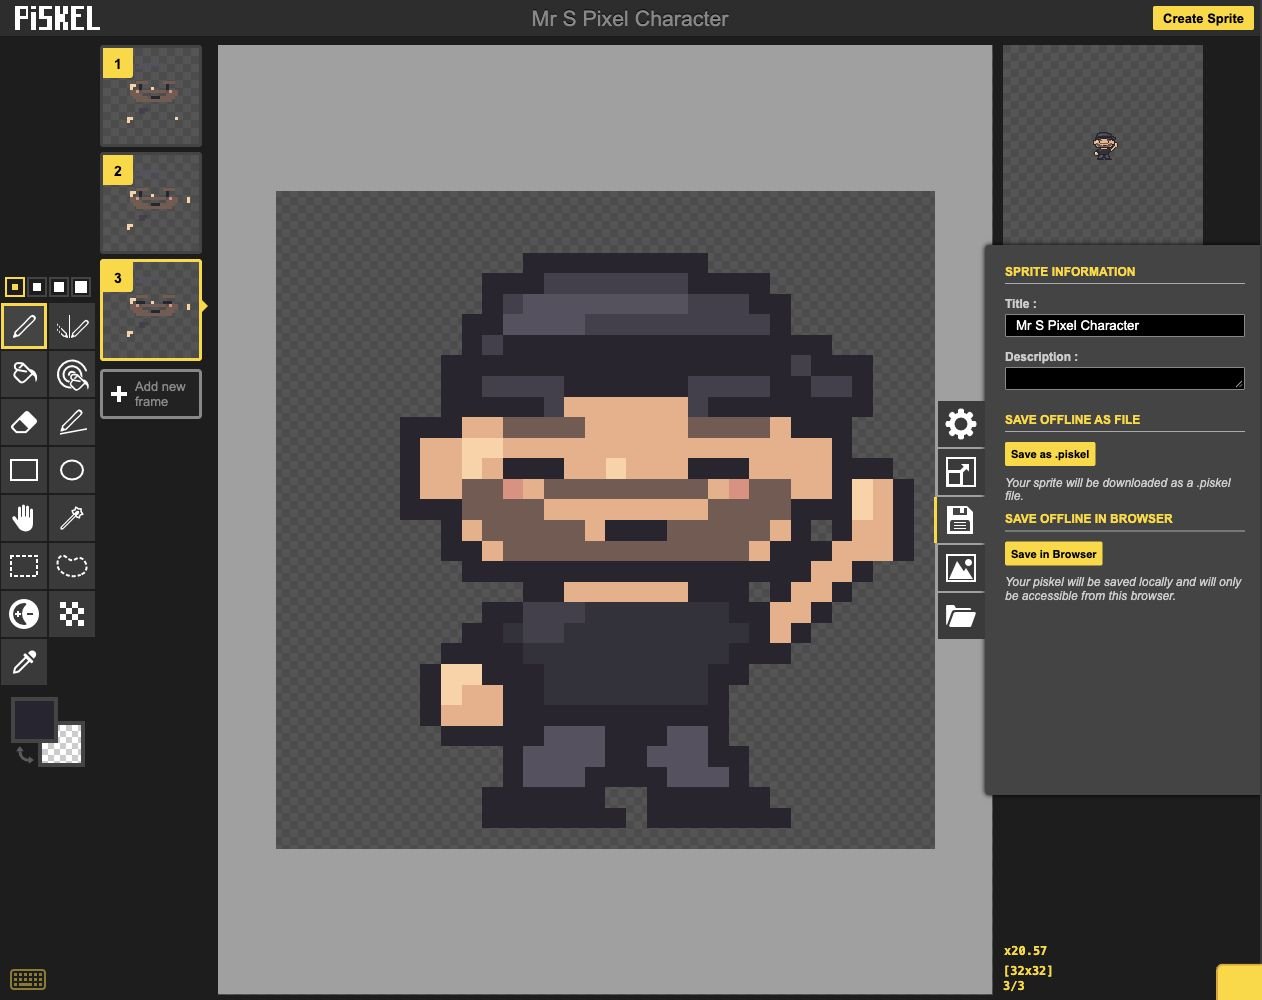
- Click: Save all frames and layers as .piskel.
- Keep: Keep the three animation frames.
Check: The latest .piskel backup is stored on your computer.
Step 2 — Reopen and check the file
- After saving, click the folder-shaped Import control. Under Load .piskel file, click Browse .piskel files and choose your latest project file. Opening a project replaces the one currently on the canvas, so save your own work first.
- The Browse images button is for pictures, not this editable project. After the project opens, check the three frames, Base and Details layers, canvas size and preview speed.
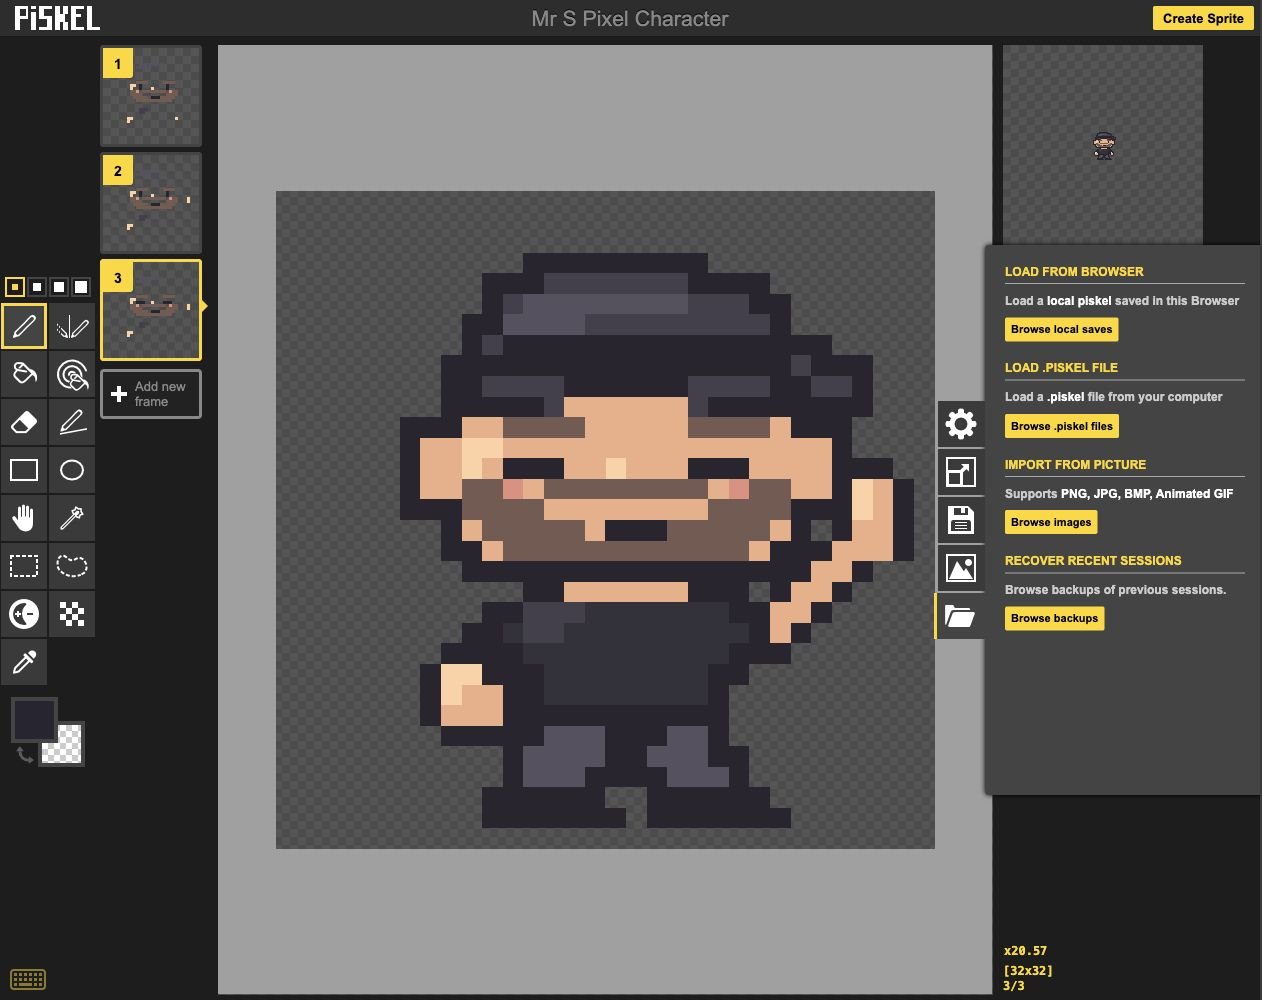
- Click: Open the folder-shaped Import control.
- Click: Choose Browse .piskel files.
Check: The imported file restores an editable animation, not one flattened picture.
Step 3 — Export a PNG sprite sheet
- Open Export and choose PNG. Enter 32 in the Resolution width field. The linked height should also be 32 and Scale should read 1.0x. These are the dimensions of each frame.
- Under Spritesheet layout options, set Columns to 3 and check Rows 1. Click Download under Spritesheet file export. A sprite sheet stores several frames inside one picture.
Optional: to save the standing pose by itself, select frame 1 and use the separate Download button under Selected frame export. At 1.0x, that picture is 32 × 32.
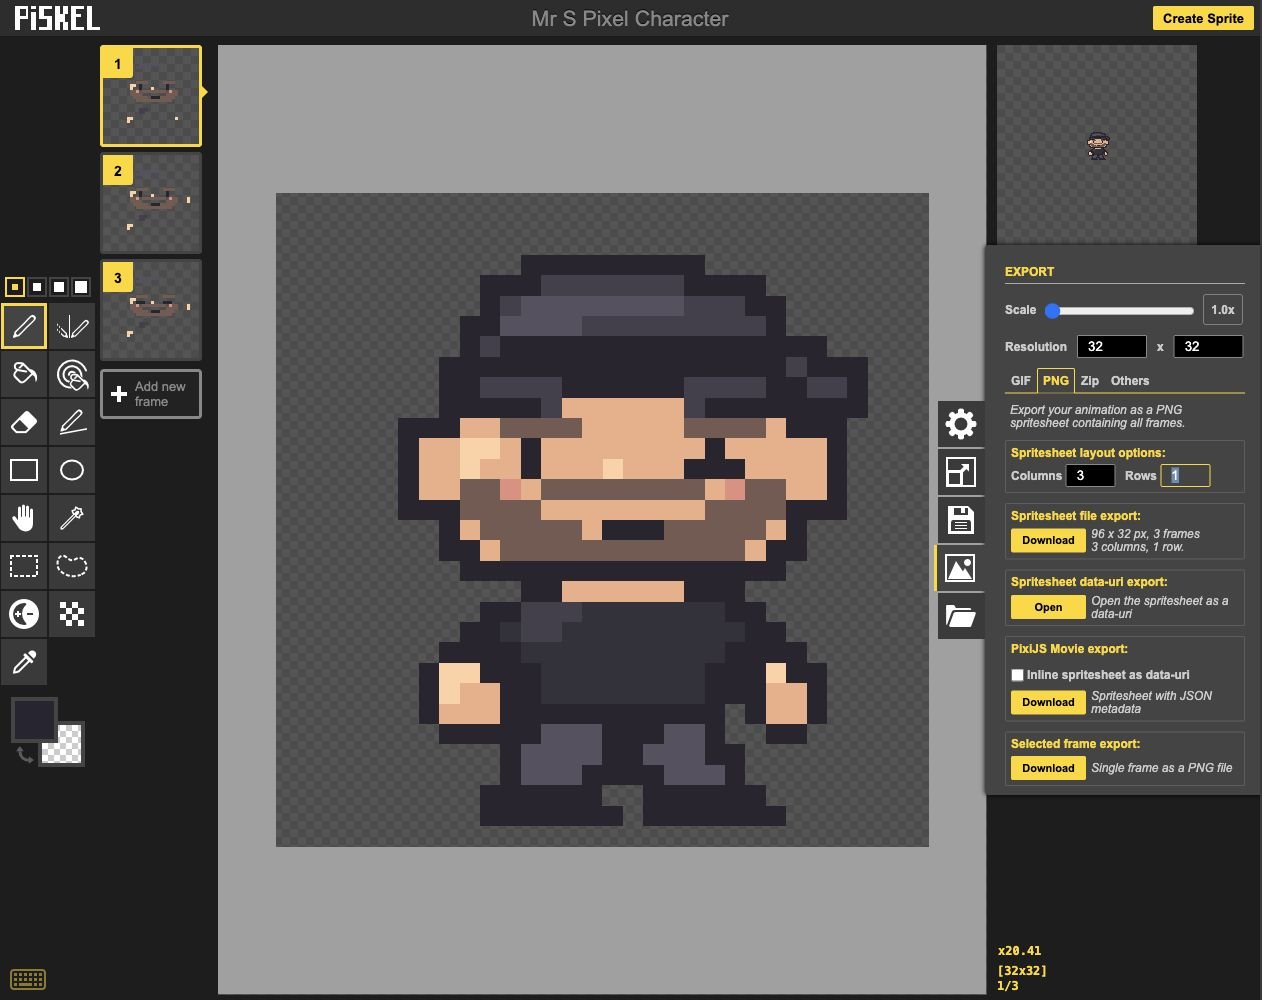
- Click: Choose the PNG export tab.
- Check: Use Scale 1.0x for game-sized pixels.
- Add: Set Columns 3 and check Rows 1.
- Click: Download the 96 × 32 sprite sheet.
- Click: Optional: download only the selected frame.
Check: The sprite-sheet PNG contains all three 32 × 32 frames in a 96 × 32 strip.
Step 4 — Export an animated GIF
- In Export, choose GIF. Enter 256 in Resolution width; the linked height becomes 256 and Scale reads 8.0x. Make sure Loop repeatedly is checked.
- Click Download below Loop repeatedly. This makes a looping 256 × 256 GIF. Scaling enlarges each original pixel; it does not add new detail.
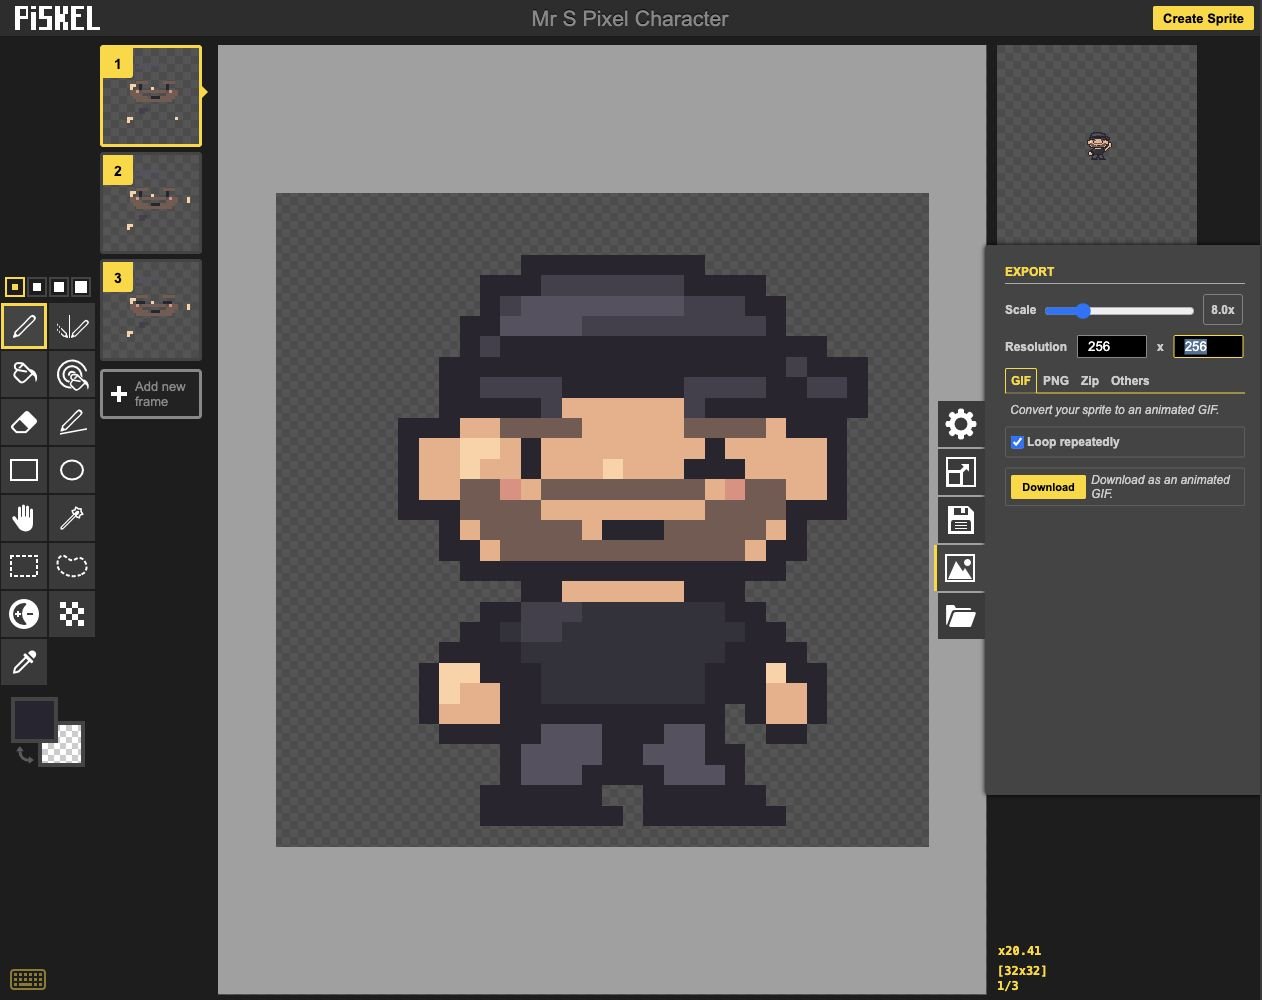
- Click: Choose the GIF export tab.
- Add: Set Resolution to 256 × 256.
- Keep: Keep Loop repeatedly checked.
- Click: Download the animated GIF.
Check: The GIF plays the wave and blink repeatedly at a clear viewing size.
Step 5 — Check the exported pictures
- Open the PNG from your downloads folder; it should be a still strip of three frames. Open the GIF in a browser to watch it animate. Some desktop picture viewers show one frame or a frame list instead of playing the loop.
- Check that the character has no painted background. The transparent area may look white or checkered depending on the app that opens the file.

- Check: Frame 1: standing.
- Check: Frame 2: waving.
- Check: Frame 3: waving and blinking.
Check: You can explain why the sprite sheet is still while the GIF moves.
Step 6 — Make it your own
- This variation is optional. Save the original first, then select Base in Layers. The pictured example changes the shirt to blue, #3588cc.
- Choose Paint all pixels of the same color (A). Hold Shift while clicking a shirt pixel to change that color across all frames. Check frames 1, 2 and 3: only the intended clothing color should change, with checkerboard still outside the character.
- Keep this version as a separate saved project, or Undo the color test if you want to return to the original. If the wrong area fills, Undo and check that Base is selected. You can use your own color choice instead.
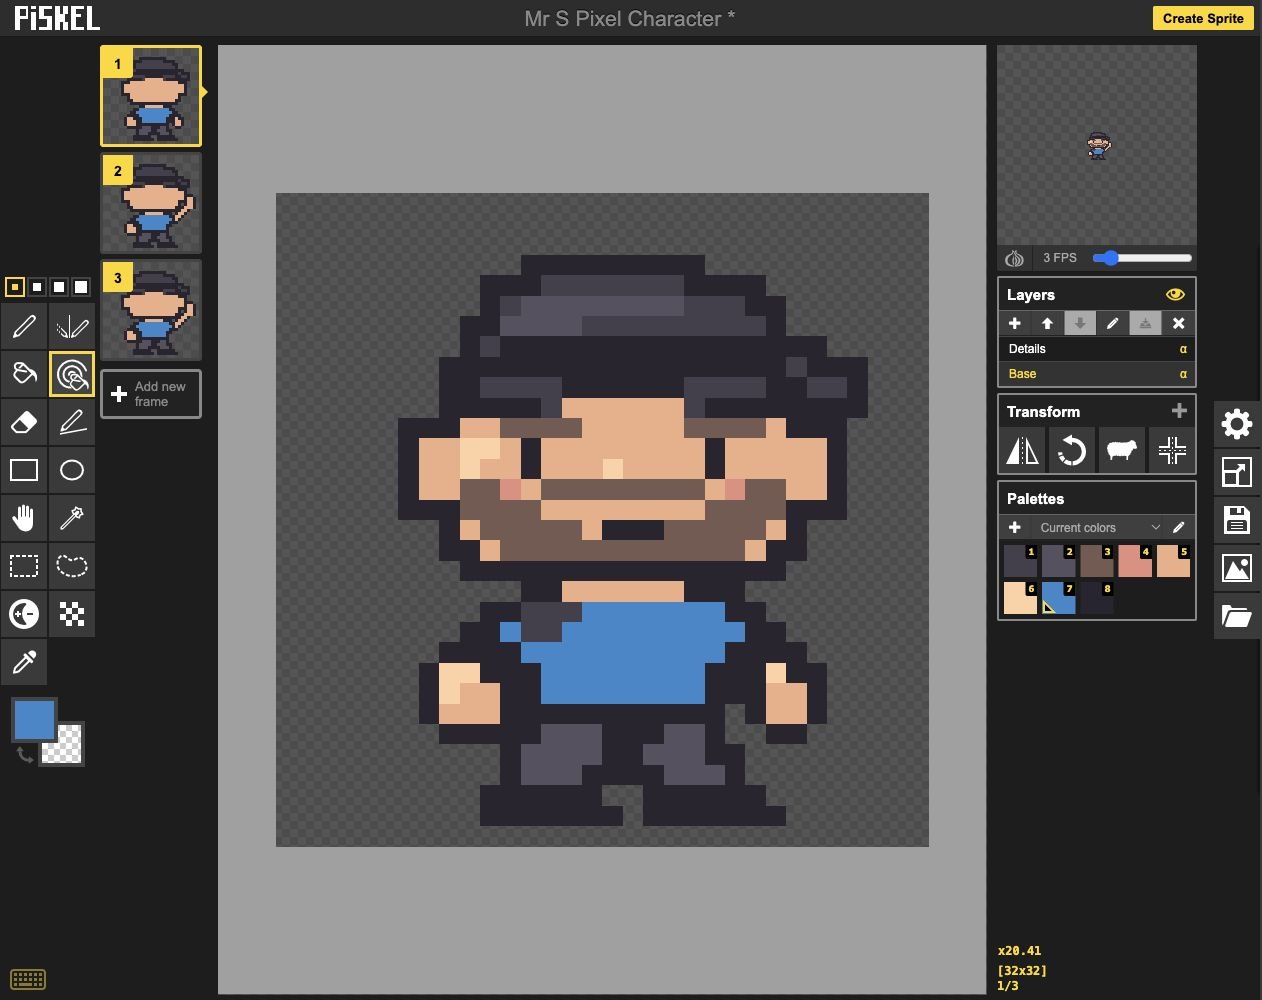
- Click: Select Base before changing the shirt.
- Check: Only the intended clothing color changes.
- Check: Keep the color consistent in all frames.
Check: An optional variation stays readable and consistent through the animation. Your original example remains saved.
Step 7 — Keep your project files together
- Keep your editable .piskel file, PNG sprite sheet and animated GIF in the same course folder. The final picture returns to Mr. S’s original dark-shirt example; keep any variation as a separate project.
- Explain each file to a partner: .piskel is for editing, PNG is a picture of the frames, and GIF shows the animation. You can use this artwork in a later game project.
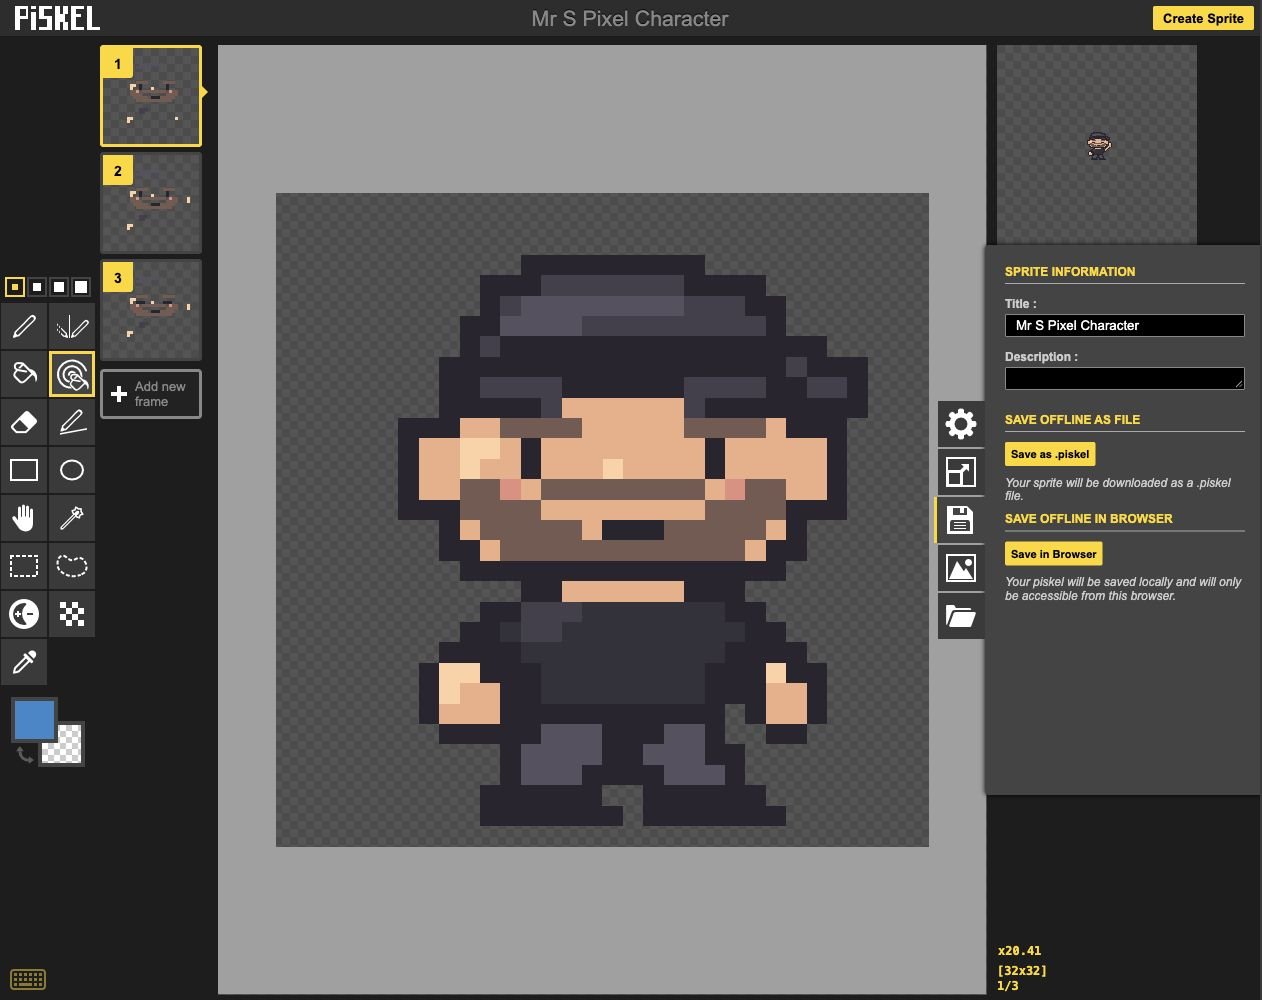
- Click: Keep an editable .piskel backup.
- Keep: Keep all three animation frames.
- Check: The original example has its dark shirt.
Check: You can find your files, reopen your project, and explain how you made the character.
Ready for the next step?
Return here anytime to review.
Finished project
Mr. S’s pixel character
Open the editable Piskel comparison to explore the finished pixel character and its small frame-by-frame wave. Save your own drawing first.
Save your own work before opening the downloaded comparison project in its editor.
Lesson discussion
Ask a question or help a classmate. Mr. S can reply here.
Loading discussion…